Project 1 - Photograms
Darkroom experiments
|
|
The darkroom
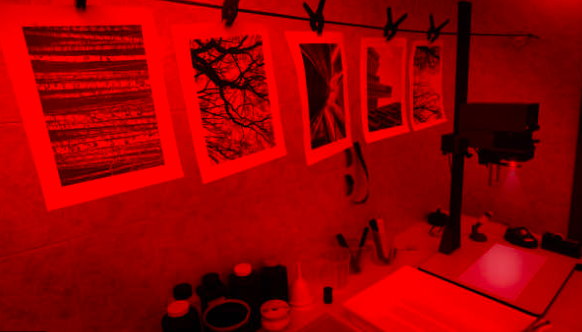
A darkroom in photography is a barely lit room where photographers develop negatives that are light sensitive converting them into printed photos. Processes in the darkroom shows you the intricate details that go into making photographs. The room is lit by only a red light to prevent the photographic paper from being exposed to bright light. Areas that aren't exposed to bright light appear white.
You place your chosen shapes/objects on your photographic paper under the enlarger and time how long you want your photo to be under light. Objects that are transparent appear grey. The photographic paper is covered in the chemical silver nitrate as it reacts to bright light. To prevent the paper from changing colour when going outside its placed into a tray with the chemical silver nitrate which is used as a developer which progressively turns the affected photographic paper a dark black. There is a safety lens on every enlarger, which you can slide in front of the bulb to stop the paper from being exposed which enables you to position your objects on your paper. Once you have taken your photo you move onto the chemicals:
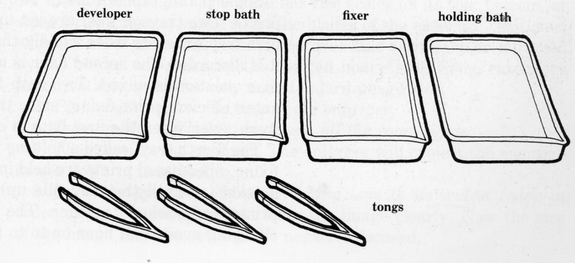
There are three trays of chemicals in the darkroom the first tray being a developer, the second a stop bath and lastly a fix.
You place your chosen shapes/objects on your photographic paper under the enlarger and time how long you want your photo to be under light. Objects that are transparent appear grey. The photographic paper is covered in the chemical silver nitrate as it reacts to bright light. To prevent the paper from changing colour when going outside its placed into a tray with the chemical silver nitrate which is used as a developer which progressively turns the affected photographic paper a dark black. There is a safety lens on every enlarger, which you can slide in front of the bulb to stop the paper from being exposed which enables you to position your objects on your paper. Once you have taken your photo you move onto the chemicals:
There are three trays of chemicals in the darkroom the first tray being a developer, the second a stop bath and lastly a fix.
- Firstly you place your blank photo into the the developer for around 2 minutes
- Then into the stop bath for roughly 30 seconds
- Next into the fix for about 4 minutes
- Finally soak in water for 3 minutes
|
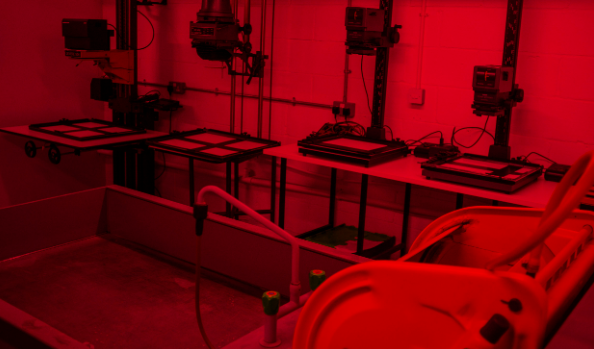
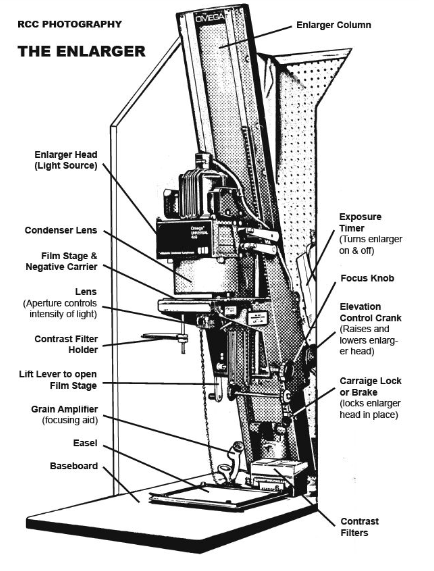
Enlargers are used in the darkroom.They contain bulbs which act as a projector shining a bright white light downwards.When photographic paper is exposed to this bright light (depending on the amount of time exposed) will determine how dark your photogram is when placed in the developer.
If you place objects that are opaque on your photographic paper under the enlarger and expose them then when you place your paper in the first chemical developer then you will begin to see the shapes of your objects appearing white contrasting with the black background. You start off by doing a test strip with your objects this helps you determine the best time of exposure for your photogram.To do this you lay your objects down and you can use the safety light to help you see where to position them.You then use some black card which will block out the light, when you expose the light you move the black card along your paper in sections then process your sample to see what the best exposure was.This helps you get the most sucesful photogram. 
|
|
Man Ray
Man Ray made photograms or as he likes to call them 'Rayograms'.He made them without using a camera or lens by placing objects such as pins and coils of wire on light sensitive paper and then in a darkroom exposed them to light.By doing this where the objects have rested on the paper they have stopped the light being exposed and when placed into chemicals which help it to develop.

First response

Solarisation
|
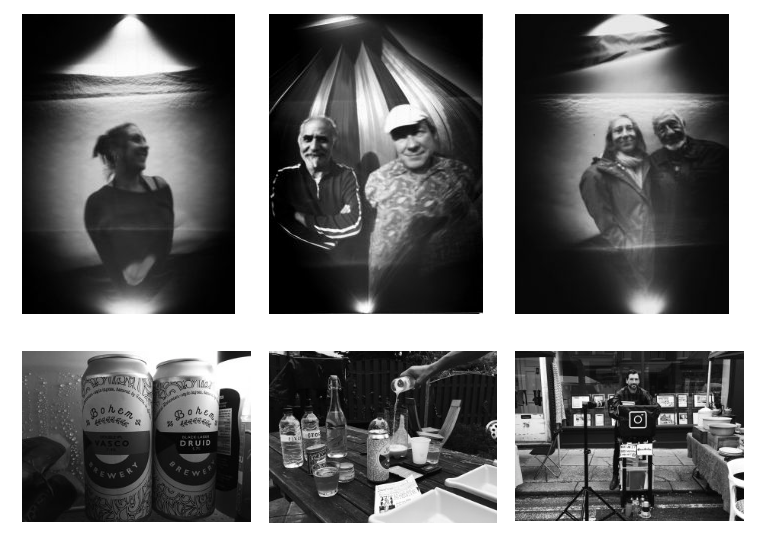
For the solarisation process the paper is exposed to the light for around 2 seconds placed into the developing tray, then when your shapes start to appear take your paper out with tongs and place it into a smaller tray to place under the enlarger which you then flash it again for around 2 seconds.You continue with the normal processes of putting you paper in the different trays.You should end up with your shadow silhouettes to be grey.I really like this affect as it created a glowing effect on the silhouettes.
|

|
Painting on developer
|
To create this painted affect you do the same process with any ordinary photogram but instead of placing your paper in the developer you paint the developing chemical onto your light sensitive paper with a thin paintbrush.If you leave some areas of your paper without developer on it it as it creates a real contrast between the underdeveloped and the developed.I was fond of this particular process as it looks as if someone has painted the picture on some plain paper.
|

|
Sandwich print
|
To create a successful sandwich print you use an ordinary photogram and placed it on-top of the shiny side of the photo sensitive paper and expose it under the enlarger for 4 seconds and then continued with all the processing chemicals which creates this juxtaposed photogram as one is black and the other white.Next time what I would attempt to avoid is getting my finger print in the photogram.
|

|
Double exposure
|
For double exposure you place your objects normally but for 2 seconds under the enlarger then I moved my objects to a different position on the light sensitive paper and flashed it for another 2 seconds when you photogram has been through all the chemical processes you should be able to see the movement of your objects and areas where you haven't over layered your objects it may appear grey.
|

|
Weave
|
To create a contrasting weave you create a sandwich print so you have two opposite pictures and then by cutting bars leaving 1cm gaps between them.One paper landscape and portrait but for one of them don't cut all the way through.You weave the loose lines of paper in opposite ways as on will go under and over and the next will differ.
|

|

Pinhole camera
The pinhole camera is based of the camera obscura however with the camera obscura its a small box or room with a small hole similar to the pinhole.It's one of the simplest cameras, they rely on straight light lines as proved by the rectilinear theory of light, and this light travels through a hole the size of a pin..When the hole is exposed/shutter is opened light shines directly through creating an image on the light sensitive paper at the back of the camera.The image is always appear upside down and looks like a reflective projection.The level of light in your environment determines how long to expose your photo sensitive paper for and should only be exposed once unless your creating a double exposure effect.
Ben Nathan
|
Ben Nathan works across different media, from painting and photography to film and sculpture. His artistic practice reflects on the functionality of the city and its industry, documenting the evolution of urban change. Its scope draws attention to basic civil amenities, and the people who serve our society, in what could be considered as the ‘Real’ but ‘Invisible City’. His explorations into infrastructure act as a catalyst to question the changing nature of our cities environment and access to public or private space.In 2020 Ben established Pinhole London, a diverse community art project that programmes workshops, events and exhibitions with a focus on championing analogue photography.
|
|
My response:
In my response to Ben Nathan I made a pinhole camera out of a can by:
- Measure a black piece of card making sure it can fit around the can and cut 1cm apart strips but leaving around 2cm below
- Cut off the top of the can using a can opener
- Wrap the black card around the can and tape it in place with black gaffer tape without putting any on the actual can
- Press down all the 1cm flaps covering the top with tape creating the lid making sure that no light gets in
- Make a tiny pin sized hole in the centre front of your can
- Cover this hole with black tape

|

|

|
Portrait
Negatives
Building
Window
Double exposure
|
Positives


|
Overall ...
The film camera
SLR Camera
|
An SLR camera is a camera that uses a mirror and prism like system that lets the photographer view the exact image that they are going to capture.To take a photograph there is a winder on the right side of the camera for you to wind the film after each image is taken so a new piece of film is ready to be exposed.
In order too have the best exposure you need a balance of aperture, shutter speed and ISO.The bright exposure of light from in front of you infiltrates the lens before bouncing off a mirror that is at an angle and hits a pentaprism, directing the light to the viewfinder. Once the image is ready to be taken, the mirror retracts and the light is projected directly onto the recording medium. Finally you have your undeveloped photo.You will have to load and unload the film.The film consists of plastic, gelatine and other material to record the image which you then place into the camera and after you capture your pictures you have to develop your film in a dark room in a different process to photograms for your images to appear |


|

|
Aperture is a tangible opening on the camera which light travels through.It's located on the lens and can be adjusted by turning it round.Its measured in F stops and every next size is half the size of the one before.The smaller the aperture the more light it lets through, creating a more exposed picture. 
|

Shutter Speed is the period of time that the film is exposed for.A slow shutter speed creates a long exposure in contrast to a fast shutter speed which creates a quicker exposure and leads the photograph to become sharper and clearer as movement isn't visible. |
|
ISO is a different types of film that controls light sensitivity .ISO allows the film to be more sensitive to light as the numbers increase suitable in low light settings ISO is more commonly used. Nonetheless, the higher the ISO the grainer.the grainier the which can problematic. The numbers follow as , 100 , 200, 400 etc |

|
Process of developing a roll of film
In this task I experimented with a SLR camera and learnt about it's features, to make sure that your film isn't exposed when loading and unloading it into your camera.When loading the film into your camera and slot it in the left side clicking it secure in place, then you thread the loose flat piece of film towards the right side in position to be reeled in by pulling the film advance lever when taking pictures.
Developing the film
After you have taken the pictures, before opening your camera turn the rewinder clockwise and you should be able to hear the film winding up on the other side and the rewinder will become stiff, now that you have gathered the film up on the left side you complete the following steps which require you to be in the dark loading room to avoid exposure to your film, once your in the loading room you need to:
|
1)Pop open the lid of the film cassette with a cassette opener and unreel the film from inside and trim the film where it connects with the piece of tape that secures the film to the plastic.
2)Begin to load the film onto the reel, begin by finding the slit on the edge of the reel and slide the film into it. Once secure, twist the side of the reel back and forth in opposite directions to wind the rest of the film. It's apparent when it's finished as all the film will be securely wrapped around the reel. 3)Then, locate your film tank’s detached core, and slide it through the hole in the centre of the film reel. 4)Next, place the reel flat in the bottom of the tank so that the core is sticking up in the centre. To make sure it’s sealed tight and that there is no liquid getting out cover your film tank with a secure lid. 5)The next process is developing your film which you then need to remove the lid and you mix 60 ml of developer with 600ml of water in a plastic cylinder and pour it into the tank. Place the lid back on securely and gently agitate the chemicals every 30 seconds for 6 minutes by slowly tipping the tank upside down and back around. 6)Pour the developer mixture out from the film tank into the sink and replace it with stop bath until tank is full. Agitate for 30 seconds to help the stop bath spread evenly throughout the tank. 7)Finally fixer chemical is used to help stabilise the film so that it can be exposed to light without darkening. Pour out your stop bath and replace it with the fixer. Follow the same agitation schedule you used with the developer mixture, leaving the fixer in the tank for roughly 6 minutes. 8)Once the fixer is removed rinse the film with water for 5 minutes to wash away excess chemicals. 9)Unravel the film and allow it to dry by hanging it straight from a peg in a locker. 10) Make sure that you have left the film to dry for over 10 hours before it is removed. |


|
Contact sheet
For this task we used an SLR film camera to capture a series of black and white film photographs.We went outside to take them as natural daylight is best when shooting with film and the quality of our images would be better, rather than doing it inside. We were set a task to experiment with different apertures and shutter speeds and take around 20 pictures.

Unfortunately, most of our film hadn't been processed as shown by the white marks.
